22 February 2013

Building Stars

Today I'm going to talk a little more about the Measuring Stars quilt -- this time about the piecing of the star and the background facets.


In my last post I mentioned that I started by making the 60-degree diamonds from mostly pink prints. I had cut a stack of 2 1/2" width-of-fabric strips almost two years ago for a project I later abandoned. But seeing that stack of fabric haunted me, and I decided to strip piece some diamonds, then follow where inspiration led. 


I strip pieced sets of 8 width-or-fabric prints in a manner similar to how you would strip piece diamonds for a lone star quilt. But here I used random strips and 60-degree angles, where a lone star requires 45-degree angles and usually a careful progression of prints.

As I pieced the strips together I offset the edges by about an inch. I trued the first angle edge by pressing and straightening the the panel as much as possible (some waviness is inevitable), aligning the ruler's 60-degree line with the center seam, and slicing off the edge.


 I sliced the diamond rows by aligning the ruler's 2 1/2" line with the cut edge, and the 60-degree line with the central seam.

To account for the waviness, I re-flattened and trued the cut edge after every two diamond strips. (I found that distortions multiplied quickly if I wasn't careful to keep the edge true.)


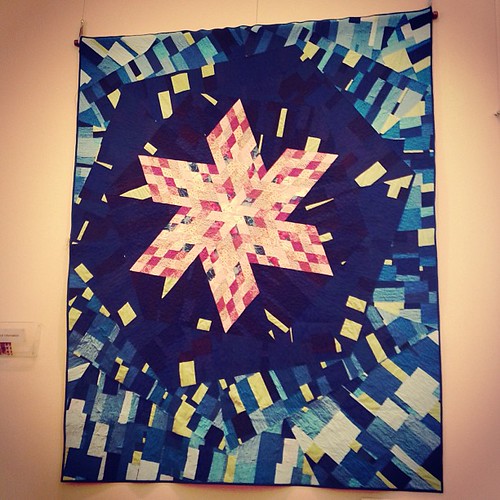
I ended up with a whole lot of diamonds -- far more than I used in this quilt -- and considered using more in the quilt top, with more stars in various sizes. As it turned out a little bit of pink goes a long way for me, so I opted for one star and the rest of the pink strips are waiting for another project (or two or three).

It took a little practice and a lot of careful pinning to get the diamond points to match. Once I got in the rhythm the six star sections came together pretty quickly.

The blue background made use of a very different process. For each hexagon ring I started with about sixteen somewhat wedge-shaped width-of-fabric strips, varying in width from 5" to 8" or so.


Also, for each ring, one of the strips was the light green (Kona Asparagus), and one or two of the strips were reserved from the first cut of the previous ring, and therefore contained smaller pieces of darker fabrics.


Next I sewed the strips into two panels, each approximately 44" square. In the above picture you can see a "reserved" strip in the top panel, second strip from the top.


Then it was time to press the seams, rotate the panels, and cut a new set of slightly wedge-shaped strips, about the same width as before. I pulled out two of the strips to add to the panels for the next ring, mixed with slightly lighter blues.

I finished the panel by sewing, cutting and sewing one more time, yielding a panel approximately 40" x 60", if memory serves.


I drafted large paper templates to cut triangles (for the innermost background) and wedges (for the three outer rings), using the same software I use to do architectural drafting. It would have been a much trickier puzzle to figure out without those tools.


I mentioned in the last post that I miscut the panels for the third ring, aligning the wrong edge of the paper template with the fabric grain (in fact, it's probably the panel-in-progress photographed above). It took a while to get started again and make a new panel. Most of those mis-cut pieces found a home on the back of the quilt.


19 February 2013

Measuring Stars

The title for the quilt I finished for my guild's Stitch Modern show this month is a mouthful: Measuring Stars With a Calculator and a Ruler. The name is a reference to a song by Au Revoir Simone. I must have been in a romantic mood.


I started this quilt without a plan, making the 60-degree diamonds from a variety of mostly pink and lavender prints, then experimenting with several arrangements. The six pointed star was my favorite.


In contrast to the regularity of the diamonds, the star is set in a series of improvisationally pieced wedges that form hexagon rings around the star.


To highlight the pinwheel movement of the asymmetric star, I rotated each successive hexagon ring by 10 degrees, always keeping the dominant grain of the improvised piecing perpendicular to the outer edge of the hexagon. One of my biggest errors in making this quilt happened when I cut the wedges for the second or third ring with the grain in the wrong direction. After that, I set the quilt aside for weeks until I was ready to recreate the pieced fabric.


I was inspired to use the green bits by the light green tones in a couple of the diamond prints. I used approximately 20 different blue solids, adding lighter solids as the rings got larger. The star is set of center, also to reinforce the sense of movement.


I used three pasterns for quilting. On the central star I used an Angela Walters inspired paisley swirl in white thread. For the inermost hexagon I pebbled in midnight blue thread, leaving the green flecks unquilted. The outer hexagons are quilted in a back-and-forth curve in various shades of blue. I must confess that quilting took a long time, as more than once my quilting caught ugly puckers on the back, and the quilt sat again for weeks waiting for me to motivate myself to unpick large sections of dense quilting.

I am happy with how the quilting turned out, especially in the bit in the above photo where the three quilting patterns come together.

I'll have some more photos and descriptions soon detailing how I constructed the diamond star and the blue fields.

09 February 2013

Geese Trails

A while back I posted photos and templates for the Trail of Geese block I designed for Monica's quilt in the Traveling Quilts round robin.


I hadn't noticed anybody using the template all these months. In fact I wondered from time to time if there was an error in the template or something. Then I saw two great examples within a couple hours and it made my day.

The first is this lyrical quilt top by Catherine Mosely. The setting is graceful, and the movement is both peaceful and compelling.

Quilt top and photo by Catherine Mosely

The second comes from the other side of the world from Kelly (blogging at jeli quilts and flickring at chunky09). The rainbow geese look so cool in the grey background. And the quilting really sings.

Cushion and photo by Kelly

04 February 2013

Dawna Bell Photography

This post is a bit off topic, but I wanted to take a moment to brag about my sister in law, Dawna Bell. She's a wonderful photographer with a real talent for detail and composition. I'm writing now because this weekend she'll be exhibiting at the Portland Yard, Garden and Patio Show, and I wanted to encourage all my Portland-area garden-loving readers to stop by.

Paperbark Maple by Dawna Bell
The garden show runs February 8-10 at the Oregon Convention Center. You can get a coupon for $2 off the admission price here.

In a Mallard's Eye by Dawna Bell
She'll have a range of beautiful prints, note card sets, and photo tiles on display and available for purchase.

Water, Rocks and Leaf by Dawna Bell
I know she's been working hard to get ready for the show, including building a pergola inside her living room, to be disassembled and then reassembled for her booth.

White Dahlia by Dawna Bell
If you go to the Portland Yard, Garden and Patio Show,  be sure to stop by booth #758, Dawna Bell Photography, across the aisle from the showcase gardens, and say 'hi' to Dawna!


02 February 2013

Stitch Modern

The opening reception for Stitch Modern, the East Bay Modern Quilt Guild's second annual exhibit, is tonight at the Piedmont Center for the Arts.


My most recent finish (phew!), Measuring Stars With a Calculator and a Ruler, is hanging. There are dozens of quilts by Bay Area quilters, and lectures and events scheduled through the month.

I hope to have better photos to share with you soon, but here's a shot Birgit was kind enough to share when the quilt was being hung.

Measuring Stars With a Calculator and a Ruler

The gallery will be open Fridays, Saturdays and Sundays from 12-3 through February 24. Read more about the show here.