30 July 2010

Marquee quilt back

I haven't finished quilting the Marquee project I posted about the other day, but I like the way it's turning out, especially the back. I'm using Kona natural muslin for the back -- it's a nice compliment to the "all cotton" print that serves as the background on the quilt top. It's very simple except for a 3-foot reverse applique of a ginkgo branch. I've cut away the natural muslin leaving a raw edge to reveal white beneath.


I love the way the dense stippling stitch (at least it's dense for me!) uniformly covers the backing and the applique, sometimes pushing the raw edge back, and sometimes tacking it down. And I can't wait to see how it comes out of the wash.

To make the pattern I photographed a neighborhood tree, simplified the photo and generated a silhouette, printed it on several pages and pinned the paper to the two layers of uncut fabric. 


I sewed loosely several times around the drawing through the paper and both layers of fabric, then pulled off the now-perforated paper and cut away the natural muslin leaving about 1/8-inch of raw edge. I'm counting on the bits of paper still stuck in the tightest corners to wash out.

25 July 2010

Quilt #4

I made a queen-sized quilt for Hamish a little over a year ago. It was my fourth quilting project and my most ambitious one to date. Before that I had made two stacked strip quilts with improvised, wedge-shaped strips that turned out fine, but were really more learning experience than artistic success. The third was a log cabin quilt for my mom. I drew the mauve and aqua color palette from her throw pillows and quilted timidly in the seams (stitched in the ditch). Although the pattern, colors and quilting were pretty conservative I was happy with the result.

But conservative wouldn't work this time. Hamish wasn't sure what he wanted, but he didn't want the quilt to look like a collection of 12" square blocks. Of all the photos I showed him he reacted most enthusiastically to Boo Davis's "Rock Out" quilt (100% amazing and possibly nsfw). And maybe an angel. And definitely no pixelated images.

Well, two out of three isn't bad.

I started with Boo's all-square one-patch pattern and envisioned the crosses with a gradient from all browns at the bottom to all blues at the top. But it needed something more. Yes, it definitely needed a pixelated tree. I started playing with a tree shape over a graduated Photoshop background.

I scanned the fabrics and created the layout in InDesign.

Then I cut out a whole lot of 2" and 3-1/2" squares (with 1/4" seam allowances the finished square sizes are 1-1/2" and 3"). While sewing I went back and forth between loving and hating the design. I really wasn't confident I was going to like the result, even when I was almost done piecing the squares together. For the quilting I took my first stab at free-motion work, sewing a curvy zig zag. When I finished the binding I was pleased with the result. And more importantly Hamish loves it.


The angel lives on the back.

23 July 2010

Hexagons

I'm thinking about starting a hexagon quilt project. I have so far avoided hand piecing in favor of the efficiency of my sewing machine. I am such a slow hand sewer. But these days I get fidgety when I have a free moment and nothing handy to sew. In the interest of always having something to take along on a train, in front of the tv or with the kid at the park, hexagons seem like a perfect long (long) term solution. 

I am going to use the English paper piecing method, which involves wrapping fabric around paper hexagons with a temporary basting stitch, hand stitching adjacent hexagons together and then removing the paper and the basting thread. 

The palette will be based on the rich red and royal blue in a shawl Hamish brought me from India.


I haven't settled on a pattern yet, but I know I'm not a grandma's-flower-garden type of guy. I'm toying with mixing small and large hexagons (3/4" and 3" sides, or 1" and 4" sides), with large fading into small. I colored up a few copies of a quick concept sketch. 

Red bigs fading into blue smalls:


Blue bigs fading into red smalls:


Blue fading to red, big and small:


I thought I was going to like the mixed colors best but right now I'm leaning toward blue bigs and red smalls. I guess that decision can wait until after I choose a size and cut out a boatload of paper hexagons.

22 July 2010

Marquee quilt

More than a year ago I started collecting blue and brown fabrics for a quilt for my bed based on the Marquee pattern from  The Modern Quilt Workshop. I set the project aside for a while, then restarted with an expanded scope when I decided to make a second quilt for Hamish's living room. Then came another project, and now I'm finally finishing my blanket. I started stippling today.


It's been a fun and relatively easy project. The all-cotton fabrics range from pricey quilt-shop purchases to bargain-bin finds. Most of the blues are royal, with a few aquas, grays and other outliers thrown in.

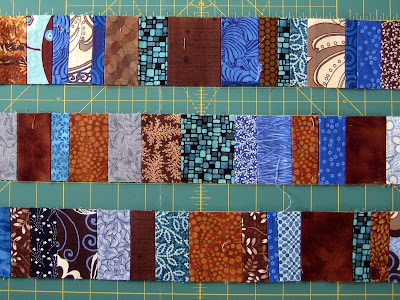
I started by cutting my browns and blues in random-width strips, selvage to selvage. When I grouped bunches of 10 to 15 strips to make panels, I found that the color balance was too heavily weighted towards brown. I liked the balance after I threw some more blue strips into the mix and sewed 17 or 18 panels, each about 24" x 42".


With the addition of the the extra blue pieces I ended up with several bonus strip panels, most of which I've been able to put to use.

The next step was to cut the panels into even strips perpendicular to the color bands. This resulted in the one tricky part of the project. The rotary cutter left the seam edges raw. Because at least one edge of each strip remained raw over most of the course of the project, the blocks required careful handling to prevent unraveling.


I cut my background fabric into 50 small squares and 49 larger squares. Although the pattern recommends solid or low-contrast prints for the background fabric I couldn't resist "All Cotton" from Alexander Henry. I pieced the strips to two oposite sides of each small square, pressed the seams flat and squared the edges on the rotary mat, then pieced, pressed and squared the remaining two edges of each small square. I arranged the resulting 99 squares, alternating solid and marquee and avoiding sequence repetition in neighboring blocks.

Once I had completed the blocks, assembling the quilt top went quickly and it was a relief to finish the pieced edges of the marquee blocks. The quilt sandwich took 396 safety pins. It also took over my entire living room. Note the sofa on end in the corner, looming over my helpful son.


Two of the extra color band panels are destined for the quilt binding. Here's the continuous bias donut.


I like the effect of the diagonal bias strips, though I wonder how durable the pieced binding will be, and I'm curious to hear about other quilters' experiences.


I'll post pictures of the finished quilt as soon as I can.

Well, hello.

For the most part I am a self-taught sewer and quilter. My mom taught me how to use a sewing machine when I was a kid, but I lost interest and didn't sew anything for years until the 2006 Gee's Bend exhibit at the De Young piqued my interest. Inspired by the confident use of color and playful improvisational technique, I immediately purchased two books on quilt making. Alas, the books sat for a few more years before I finally started sewing in 2009. But now I'm hooked.

Every time I stumble upon a new (or old, as the case might be) technique and realize that I've been doing it wrong, I tell myself that I really should take a class or two. And some day that might happen, but for now I'm studying pictures on flickr for inspiration and technique, searching blogs for pointers, and hitting youtube when I need some video to wrap my head around a new concept. All of which is to say that I am no expert.

I'm not sure what ambitions I have for this blog. While I'm interested in sharing finished work as well as the creative process and techniques I use to achieve it, I also look forward to feedback and discussion.